源码剖析 Spring 循环依赖
循环依赖在编程中是一个常见问题(当然,这并不是最佳实践)。并且,Spring 如何解决循环依赖这个问题在面试中也经常见。下面,D瓜哥就从源码的层面深入剖析一下这个问题。
示例程序
先展示一下示例程序:
package com.diguage.truman.context;
import org.apache.commons.logging.Log;
import org.apache.commons.logging.LogFactory;
import org.junit.jupiter.api.Test;
import org.springframework.beans.factory.annotation.Autowired;
import org.springframework.context.annotation.AnnotationConfigApplicationContext;
import org.springframework.context.annotation.Configuration;
import org.springframework.context.annotation.Import;
import org.springframework.context.annotation.ImportSelector;
import org.springframework.core.type.AnnotationMetadata;
import org.springframework.stereotype.Component;
/**
* @author D瓜哥, https://www.diguage.com/
* @since 2020-05-24 13:02
*/
public class CircularDependenceSingletonTest {
public static final Log log = LogFactory.getLog(CircularDependenceSingletonTest.class);
@Test
public void test() {
AnnotationConfigApplicationContext applicationContext
= new AnnotationConfigApplicationContext();
applicationContext.register(Config.class);
applicationContext.refresh();
log.info(applicationContext.getBean(A.class));
log.info(applicationContext.getBean(B.class));
log.info(applicationContext.getBean(C.class));
log.info("-A--------");
A a = applicationContext.getBean(A.class);
log.info(a);
log.info(a.b);
log.info("-B--------");
B b = applicationContext.getBean(B.class);
log.info(b);
log.info(b.c);
log.info("-C--------");
C c = applicationContext.getBean(C.class);
log.info(c);
log.info(c.a);
}
@Configuration
@Import(AbcImportSelector.class)
public static class Config {
}
public static class AbcImportSelector implements ImportSelector {
@Override
public String[] selectImports(AnnotationMetadata importingClassMetadata) {
return new String[]{
A.class.getName(),
B.class.getName(),
C.class.getName()};
}
}
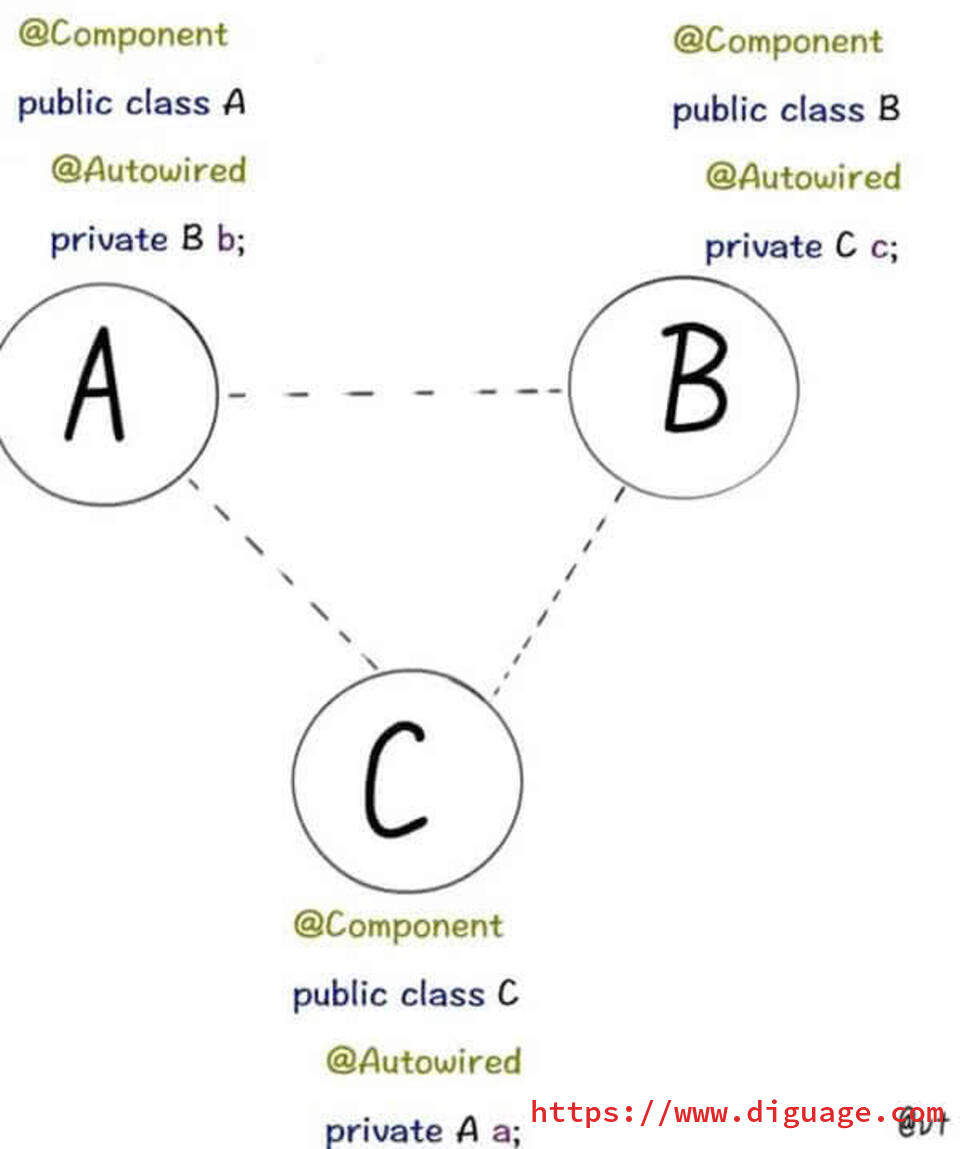
@Component
public static class A {
@Autowired
B b;
}
@Component
public static class B {
@Autowired
C c;
}
@Component
public static class C {
@Autowired
A a;
}
}上述示例代码中的循环依赖情况如下:
源码剖析
三级缓存
D瓜哥在 深入剖析 Spring 核心数据结构:BeanFactory 中,概要性地对 BeanFactory 的属性做了一一说明。
而其中的“三级缓存”属性,则是解决循环依赖问题的关键所在:
Map<String, Object> singletonObjects = new ConcurrentHashMap<>(256):Bean 名称到单例 Bean 的映射,用于存放完全初始化好的 Bean。可以理解成,这就是所谓的容器。这是一级缓存。Map<String, Object> earlySingletonObjects = new HashMap<>(16):Bean 到“未成熟”单例 Bean 的映射。该 Bean 对象只是被创建出来,但是还没有注入依赖。在容器解决循环依赖时,用于存储中间状态。这是二级缓存。Map<String, ObjectFactory<?>> singletonFactories = new HashMap<>(16):Bean 名称到 Bean 的 ObjectFactory 对象的映射,存放 Bean 工厂对象。在容器解决循环依赖时,用于存储中间状态。这是三级缓存。
Bean 的获取过程就类似计算机缓存的作用过程:先从一级获取,失败再从二级、三级里面获取。在 org.springframework.beans.factory.support.DefaultSingletonBeanRegistry#getSingleton(java.lang.String, boolean) 方法中,可以明确看到整个过程:
org.springframework.beans.factory.support.DefaultSingletonBeanRegistry#getSingleton(beanName, allowEarlyReference)/**
* Return the (raw) singleton object registered under the given name.
* <p>Checks already instantiated singletons and also allows for an early
* reference to a currently created singleton (resolving a circular reference).
* @param beanName the name of the bean to look for
* @param allowEarlyReference whether early references should be created or not
* @return the registered singleton object, or {@code null} if none found
*/
@Nullable
protected Object getSingleton(String beanName, boolean allowEarlyReference) {
Object singletonObject = this.singletonObjects.get(beanName);
if (singletonObject == null && isSingletonCurrentlyInCreation(beanName)) {
synchronized (this.singletonObjects) {
singletonObject = this.earlySingletonObjects.get(beanName);
if (singletonObject == null && allowEarlyReference) {
ObjectFactory<?> singletonFactory = this.singletonFactories.get(beanName);
if (singletonFactory != null) {
singletonObject = singletonFactory.getObject();
this.earlySingletonObjects.put(beanName, singletonObject);
this.singletonFactories.remove(beanName);
}
}
}
}
return singletonObject;
}Bean 创建过程
D瓜哥在 Spring Bean 生命周期概述 中专门讨论过 Bean 的生命周期函数。Bean 的实例创建和依赖注入是分开来处理的。具体到 Spring 的内部函数调用,有可以描述成如下:
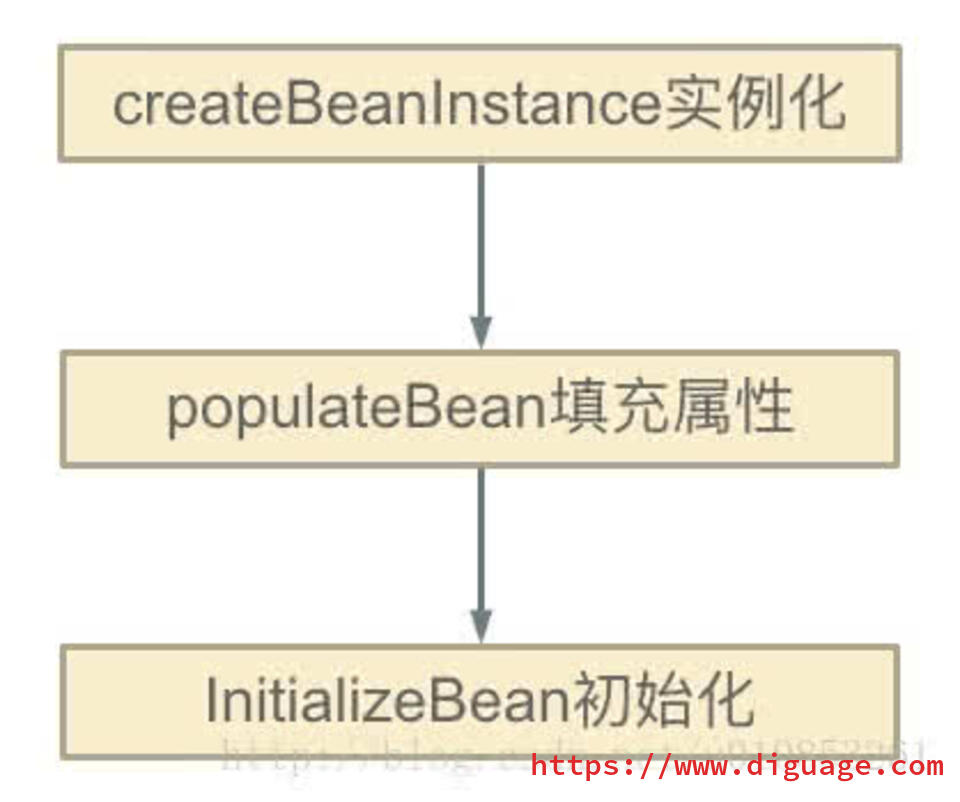
在 org.springframework.beans.factory.support.AbstractAutowireCapableBeanFactory#doCreateBean 方法中,能明确看到三个方法的调用过程。在这个方法上打上断点,开始调试。
实例创建
org.springframework.beans.factory.support.AbstractAutowireCapableBeanFactory#doCreateBean// Instantiate the bean.
BeanWrapper instanceWrapper = null;
if (mbd.isSingleton()) {
instanceWrapper = this.factoryBeanInstanceCache.remove(beanName);
}
if (instanceWrapper == null) {
// 这个方法里面完成了对象创建,仅仅是对象
// 执行完整个方法,可以看看控制台的变化
/**
* 创建 bean 实例,并将实例包裹在 BeanWrapper 实现类对象中返回。
* createBeanInstance中包含三种创建 bean 实例的方式:
* 1. 通过工厂方法创建 bean 实例
* 2. 通过构造方法自动注入(autowire by constructor)的方式创建 bean 实例
* 3. 通过无参构造方法方法创建 bean 实例
*
* 若 bean 的配置信息中配置了 lookup-method 和 replace-method,则会使用 CGLIB
* 增强 bean 实例。关于lookup-method和replace-method后面再说。
*/
instanceWrapper = createBeanInstance(beanName, mbd, args);
}
Object bean = instanceWrapper.getWrappedInstance();关于 createBeanInstance 方法,已经在上面的注释中增加了响应说明,这里就不再贴代码了。
依赖注入
接着上面的代码,往下看,看如何完成注入的:
org.springframework.beans.factory.support.AbstractAutowireCapableBeanFactory#doCreateBeanObject bean = instanceWrapper.getWrappedInstance();
Class<?> beanType = instanceWrapper.getWrappedClass();
if (beanType != NullBean.class) {
mbd.resolvedTargetType = beanType;
}
// Allow post-processors to modify the merged bean definition.
synchronized (mbd.postProcessingLock) {
if (!mbd.postProcessed) {
try {
applyMergedBeanDefinitionPostProcessors(mbd, beanType, beanName);
}
catch (Throwable ex) {
throw new BeanCreationException(mbd.getResourceDescription(), beanName,
"Post-processing of merged bean definition failed", ex);
}
mbd.postProcessed = true;
}
}
// Eagerly cache singletons to be able to resolve circular references
// even when triggered by lifecycle interfaces like BeanFactoryAware.
boolean earlySingletonExposure = (mbd.isSingleton() && this.allowCircularReferences &&
isSingletonCurrentlyInCreation(beanName));
if (earlySingletonExposure) {
if (logger.isTraceEnabled()) {
logger.trace("Eagerly caching bean '" + beanName +
"' to allow for resolving potential circular references");
}
addSingletonFactory(beanName, () -> getEarlyBeanReference(beanName, mbd, bean));
}
// Initialize the bean instance.
Object exposedObject = bean;
try {
// 设置属性,非常重要 FIXME
populateBean(beanName, mbd, instanceWrapper);addSingletonFactory
先来看看 addSingletonFactory 方法:
org.springframework.beans.factory.support.DefaultSingletonBeanRegistry#addSingletonFactory/**
* Add the given singleton factory for building the specified singleton
* if necessary.
* <p>To be called for eager registration of singletons, e.g. to be able to
* resolve circular references.
* @param beanName the name of the bean
* @param singletonFactory the factory for the singleton object
*/
protected void addSingletonFactory(String beanName, ObjectFactory<?> singletonFactory) {
Assert.notNull(singletonFactory, "Singleton factory must not be null");
synchronized (this.singletonObjects) {
if (!this.singletonObjects.containsKey(beanName)) {
this.singletonFactories.put(beanName, singletonFactory);
this.earlySingletonObjects.remove(beanName);
this.registeredSingletons.add(beanName);
}
}
}从这里可以明显看出,代码符合我们上面注释中的描述: singletonFactory 变量被放入到 singletonFactories 变量中了。
populateBean
再来看看 populateBean
org.springframework.beans.factory.support.AbstractAutowireCapableBeanFactory#populateBean/**
* Populate the bean instance in the given BeanWrapper with the property values
* from the bean definition.
* @param beanName the name of the bean
* @param mbd the bean definition for the bean
* @param bw the BeanWrapper with bean instance
*/
@SuppressWarnings("deprecation") // for postProcessPropertyValues
protected void populateBean(String beanName, RootBeanDefinition mbd, @Nullable BeanWrapper bw) {
// 省略 N 行代码……
boolean hasInstAwareBpps = hasInstantiationAwareBeanPostProcessors();
boolean needsDepCheck = (mbd.getDependencyCheck() != AbstractBeanDefinition.DEPENDENCY_CHECK_NONE);
PropertyDescriptor[] filteredPds = null;
if (hasInstAwareBpps) {
if (pvs == null) {
pvs = mbd.getPropertyValues();
}
for (InstantiationAwareBeanPostProcessor bp : getBeanPostProcessorCache().instantiationAware) {
// 从这里开始注入依赖,
// 如果 bp 是 CommonAnnotationBeanPostProcessor 或 AutowiredAnnotationBeanPostProcessor 就执行注入
PropertyValues pvsToUse = bp.postProcessProperties(pvs, bw.getWrappedInstance(), beanName);
if (pvsToUse == null) {
if (filteredPds == null) {
filteredPds = filterPropertyDescriptorsForDependencyCheck(bw, mbd.allowCaching);
}
pvsToUse = bp.postProcessPropertyValues(pvs, filteredPds, bw.getWrappedInstance(), beanName);
if (pvsToUse == null) {
return;
}
}
pvs = pvsToUse;
}
}
if (needsDepCheck) {
if (filteredPds == null) {
filteredPds = filterPropertyDescriptorsForDependencyCheck(bw, mbd.allowCaching);
}
checkDependencies(beanName, mbd, filteredPds, pvs);
}
if (pvs != null) {
applyPropertyValues(beanName, mbd, bw, pvs);
}
}在 Spring Bean 生命周期概述 中对 Bean 的生命周期做了概要的介绍。这里就体现出来 CommonAnnotationBeanPostProcessor 和 AutowiredAnnotationBeanPostProcessor 的作用。上面我们用的是 @Autowired 注解。所以,这里使用 AutowiredAnnotationBeanPostProcessor 来处理。
依赖注入的调用链
查找依赖的调用链很繁琐,中间有牵涉到 Bean 创建的过程,这里只列出调用过程中的主要方法列表,需要请根据自己需要来单步调试。
完成依赖注入的调用链如下:
org.springframework.beans.factory.support.AbstractAutowireCapableBeanFactory#populateBeanorg.springframework.beans.factory.annotation.AutowiredAnnotationBeanPostProcessor#postProcessPropertiesorg.springframework.beans.factory.annotation.InjectionMetadata#injectorg.springframework.beans.factory.annotation.AutowiredAnnotationBeanPostProcessor.AutowiredFieldElement#injectorg.springframework.beans.factory.support.DefaultListableBeanFactory#resolveDependencyorg.springframework.beans.factory.support.DefaultListableBeanFactory#doResolveDependencyorg.springframework.beans.factory.config.DependencyDescriptor#resolveCandidateorg.springframework.beans.factory.support.AbstractBeanFactory#getBean(java.lang.String)org.springframework.beans.factory.annotation.InjectionMetadata#inject— 最后,还是在这里完成注入。
加入容器
在 org.springframework.beans.factory.support.DefaultSingletonBeanRegistry#getSingleton(String, ObjectFactory<?>) 方法中,可以看到 Spring 在获得 Bean 实例后的处理过程:
org.springframework.beans.factory.support.DefaultSingletonBeanRegistry#getSingleton(String, ObjectFactory<?>)/**
* Return the (raw) singleton object registered under the given name,
* creating and registering a new one if none registered yet.
* @param beanName the name of the bean
* @param singletonFactory the ObjectFactory to lazily create the singleton
* with, if necessary
* @return the registered singleton object
*/
public Object getSingleton(String beanName, ObjectFactory<?> singletonFactory) {
Assert.notNull(beanName, "Bean name must not be null");
synchronized (this.singletonObjects) {
Object singletonObject = this.singletonObjects.get(beanName);
if (singletonObject == null) {
if (this.singletonsCurrentlyInDestruction) {
throw new BeanCreationNotAllowedException(beanName,
"Singleton bean creation not allowed while singletons of this factory are in destruction " +
"(Do not request a bean from a BeanFactory in a destroy method implementation!)");
}
if (logger.isDebugEnabled()) {
logger.debug("Creating shared instance of singleton bean '" + beanName + "'");
}
beforeSingletonCreation(beanName);
boolean newSingleton = false;
boolean recordSuppressedExceptions = (this.suppressedExceptions == null);
if (recordSuppressedExceptions) {
this.suppressedExceptions = new LinkedHashSet<>();
}
try {
singletonObject = singletonFactory.getObject();
newSingleton = true;
}
catch (IllegalStateException ex) {
// Has the singleton object implicitly appeared in the meantime ->
// if yes, proceed with it since the exception indicates that state.
singletonObject = this.singletonObjects.get(beanName);
if (singletonObject == null) {
throw ex;
}
}
catch (BeanCreationException ex) {
if (recordSuppressedExceptions) {
for (Exception suppressedException : this.suppressedExceptions) {
ex.addRelatedCause(suppressedException);
}
}
throw ex;
}
finally {
if (recordSuppressedExceptions) {
this.suppressedExceptions = null;
}
afterSingletonCreation(beanName);
}
if (newSingleton) {
// 创建完 Bean 后,将其加入到容器中
addSingleton(beanName, singletonObject);
}
}
return singletonObject;
}
}加入容器的操作也很简单:
org.springframework.beans.factory.support.DefaultSingletonBeanRegistry#addSingleton/**
* Add the given singleton object to the singleton cache of this factory.
* <p>To be called for eager registration of singletons.
* @param beanName the name of the bean
* @param singletonObject the singleton object
*/
protected void addSingleton(String beanName, Object singletonObject) {
synchronized (this.singletonObjects) {
this.singletonObjects.put(beanName, singletonObject);
this.singletonFactories.remove(beanName);
this.earlySingletonObjects.remove(beanName);
this.registeredSingletons.add(beanName);
}
}小结
这里,假设 A → B 和 B → A 两层循环依赖来说明问题
通过
applicationContext.getBean(A.class)方法,委托给AbstractBeanFactory#doGetBean方法来尝试获取 Bean;获取不到则开始创建;Bean 是调用
instanceWrapper = createBeanInstance(beanName, mbd, args);方法创建出来了实例,然后又通过addSingletonFactory(beanName, () → getEarlyBeanReference(beanName, mbd, bean));将已经创建的实例封装到一个ObjectFactory<?> singletonFactory匿名类中,放入到三级缓存中。在
populateBean(beanName, mbd, instanceWrapper);方法,通过CommonAnnotationBeanPostProcessor和AutowiredAnnotationBeanPostProcessor的postProcessProperties查找依赖,完成注入。查找依赖时,就会通过调用
getBean(beanName)获取 BeanB。此时,还没有 BeanB,则会从这里的第二步开始执行,创建实例,封装后加入到三级缓存singletonFactories中,调用populateBean(beanName, mbd, instanceWrapper);方法,通过CommonAnnotationBeanPostProcessor和AutowiredAnnotationBeanPostProcessor的postProcessProperties查找依赖,完成注入。依赖注入的过程,请看 依赖注入的调用链 小节。到这里,就要查找 Bean
A了,一二三级缓存依次来查找(DefaultSingletonBeanRegistry#getSingleton(beanName, allowEarlyReference)),在三级缓存中,找到了对应的ObjectFactory<?> singletonFactory实例,然后调用getObject()方法,获得A的实例,将其加入到二级缓存中,将三级中的相关内容清理掉。从这里也可以看出,通过AbstractBeanFactory#doGetBean方法获得的 Bean 不一定是完全初始化好的 Bean,有可能是一个未完成初始化的实例对象。获得
A的实例后,就可以完成 BeanB的初始化,调用DefaultSingletonBeanRegistry#addSingleton方法,将其加入一级缓存singletonObjects中,也就是容器中。(由于 BeanB可以直接完成依赖注入,则它不会从三级缓存跳到二级缓存。最后的三级缓存在调用addSingleton方法时,直接被清理掉了。)
到这里就可以获取 Bean
B了,然后完成A的依赖注入。
最后,通过调用
DefaultSingletonBeanRegistry#addSingleton方法,将 BeanA加入到一级缓存singletonObjects中,也就是容器中。所有的初始化工作就完成了。
需要注意的是,有两种情况,Spring 是没办法完成循环注入的:
构造函数注入 — 这种要求在实例之前创建好依赖的实例,但是明显无法完成,所以不能解决循环依赖。
PROTOTYPE类型的 Bean 相互依赖 — 刚刚看到,上面的三级缓存变量都是为SINGLETON类型的 Bean 准备的。PROTOTYPE类型的 Bean 在检查到循环依赖时,就直接抛异常了。